|
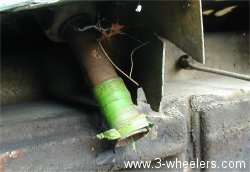
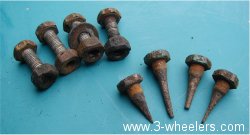
After working on the new drivers door, I decided the time had come to tackle the job of getting the old ones off - and it was a bit too easy. I had expected a nightmare of a job, especially as the drivers door had the back of the bolts fibreglassed over. I figured Id tackle the worst door first and so after leaning into the engine bay, broke away the fibre glass from around the bolts. I then discoverd that if I sat inside the body, I could poke my hand through the speedo hole and hold the back on the nuts tight with a spanner as I turned the rachet at the front. The bolts came off amazingly easy and I was stunned. Then I had to tackle the bottom hinge, sadly my arms are not 9 feet long so I could not reach back and front. Spying my girlfriend (Sue) sun bathing in the garden with just her bikini on I shouted over, Can you give me a hand with this please?. Sue replied, whats up?. I said, Im having problems holding my nuts. As she grabbed hold of my tool she said, what do I do with this? I said, you have to hold it at the end and with small movements keep moving your wrist from side to side until it comes off. I continued, when the nuts fall off then you can stop. I clambered into the engine bay, all dirty and mucky holding the nut on the back of the bolt, as she sat inside the body, all pristine and clean, with the ratchet. Within a couple of minutes the door was off and then the passenger door soon followed. I thanked my glamourous assistant who then went back to enjoy the Sunday papers as I tinkered on. As reported last month the back door is wonky. I soon found out why. The bolts holding the door on had rusted so much they were almost nails. (have a look at the last photo on this page) I could not believe they could rot so much but at least it explains why the door was not shutting properly.
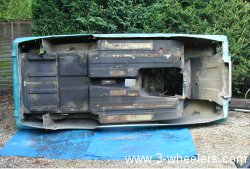
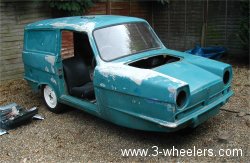
By now Geoff had turned up in his home made 4x4 racer modified from an old 1956 Landrover.(Id taken a photo so you could see it but for some reason it wasnt on the disc). So after a cup of tea, we turned the whole body onto its side. Without doors attached to it the shell was astronomically lighter and we soon realised that it would only need two of us to put the body back on. (Taking it off it seemed a lot heavier). Inspecting under the body we noticed straight away that the fuel filler pipe was held together with PVC (insulation) tape and in one area was just tape. Luckily I have managed to get a new tube for this. There were a couple of fibre glass jobs that could have been done but they were only minor and so I decided they could be done with the body on the chassis.
Armed with paint scrapers we scraped off 30 years of mud and dirt that had accumulated on the body. We then sprayed the bottom with Stone Chip, especially in the areas where the body makes contact with the chassis. Allowing the body to dry we set about a few last task on the chassis that included connecting the fuel pipe to the petrol tank and thanks to Ray Whitehurst (str8lolly) attached a new fuel pipe that he kindly donated for the rebuild.
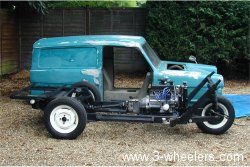
Once the body was dry the time had come, Geoff poked a hand through each headlight hole and I picked the shell up from the rear bumper. We lifted it up and over and then just plonked it on the chassis, I had to bend the back of the bumper a little to get it over the chassis, but it all mated up with ease. I worry so much when things go right straight away.
Geoff then dug out the sander and attacked the front wing. This time all the plaster was sanded off to reveal the cars past history. We have said all along that the car has been rolled but now we could see the damage that was caused. From above the headlamp (drivers side) and about a third of the way up the wing is a join mark that shows that the front half of the wing has come from another blue Regal. A patch from the same car was also used again next to the door and again to provide the corner of the rear bumper. Who ever did it actually made quite a good job, but then lots of filler and then fibreglass was built over that. This made the wing look as though I would need to cut half of it away but once all the cosmetic stuff has been taken off down to the repair itself, the wing suddenly looks a lot better and will hopefully need half the work I anticipated. Whilst the body was on its side we noticed that there are fibreglass patches all along the drivers side and some just came off when I lightly tugged on them. The task now is lots more sanding and then out with the resin and fibreglass mat.
Go to page 3
|