|
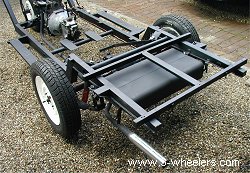
Due to May being a really busy month my brother and I only got one good weekend to work on the Regal though I had been able to spend an hour or so here and there continuing to clean things up and obtaining more parts. The biggest job at the beginning of the month was sanding down the wheels. They were pretty well rusted, though after getting the old Goodyear 5.20 - 13 cross ply tyres off them they were not too bad inside. They all took a serious amount of sanding but once they were ready I gave them all (four of them so I have one spare) two coats of smooth white Hammerite paint. As I painted them with a brush they are not perfect but far better than they were. I was in a quandary as to what tyres to get as the originals were 140 mm wide. Many people seem to have 145s on their Regals though a couple of people said go for the 135s as with a heavy load in the back they can rub. In the end I decided upon 145/80 tyres as essentially most of the time the back of the van will be empty - and I figured being a 3-wheeler I need as much contact with the road as possible.
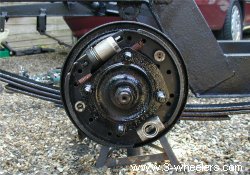
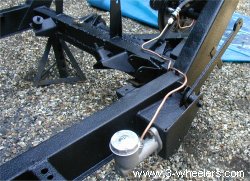
So the weekend in question starting bright and sunny and we set about working on the Reliant. First of all we had to pull the rear hubs off again as they were leaking oil for some reason. This time we discarded using gaskets and used a liquid gasket. That seems to have done the trick and the leak has now stopped. Always amazing me with his vast assortment of tools my brother didnt fail to impress me again as he opened up a tin box with a gadget that can make brake pipes. With a coil of copper tubing and bag of end bits he set about making up new brake pipes - better still unlike the original steel ones, copper will not rust. Being a Landrover guru he also managed to source a new Master Cylinder. The Clutch Master Cylinder from a Series 3 Landrover is exactly the same as the Reliant Master Cylinder - the only difference is that at £13 the Landrover part cost five times less.
Whilst Geoff was doing that I set about rebuilding the brakes. I bought new wheel cylinders from Carwise Reliant Spares but the original springs, brake shoes and adjusters showed very little signs of wear and so after a good clean up they were all as good as new. Thanks to new Regal brake hoses from Duncan Bradford, the brakes were complete - except we had no brake fluid and so they could not be bled.
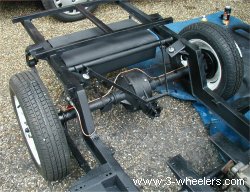
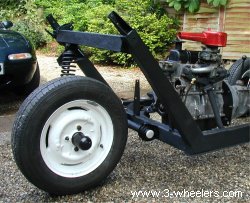
The old petrol tank was in a seriously bad state and looked as though it had been repaired with fibre glass. When my brother carefully examined it with an 8 inch chisel and hammer our suspicions were confirmed. It had a big hole that had been fibre glassed over. We have taken the old sender unit from it but that (like most other things) has seen better days and so hopefully some one somewhere has a new sender unit. Luckily help was at hand from Reliant Services in Stirchley and we bought a brand new tank off them. After coating it in stone chip proof stuff, that was fitted along with some new Mini Shocks that I got off ebay. They were designed for a 1969 - 1985 Austin Mini but they fitted perfectly.
Looking at the chassis I decided to spray underneath with another protective layer and used the stone chip proof stuff. That seemed to have quite a reaction and broke up and after my brother sprayed a part it seemed to eat straight through the Tetra Shultz to the chassis. Fearing the worst I unfairly ranted at my brother that this stuff was going to ruin the chassis and imagined all the Tetra Shultz peeling off. When it was wet it seemed a bit iffy but as it dried it did seem to harden up quite a bit. I shall have to check it again in a few days to make sure that it is OK. I dont want to have to strip the bottom of the chassis. The only reason I brought the stone chip proof stuff was because the shop had no Tetra Schultz left. So my fingers are crossed it will be OK.
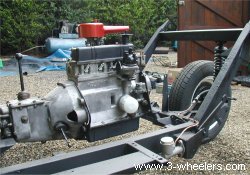
With the Stone Chip stuff appearing to set we then decided to replace the thrust pad in the gear box, bolt it back onto the engine and mount it back on to the chassis. Unfortunately we do not have any kind of work benches to work on and Im not sure my girlfriend would take kindly to me building an engine on the dining room table! Having the engine in the chassis mounts it off the ground so that we can work all around it and holds it solid. If possible we do not want to take the head off as the engine appeared to run great and so once mounted I brushed and polished it off with a wire brush on a drill. Whilst my brother worked on one side mounting the manifold and exhaust I replaced all the plugs, condenser, contact points and distributor cap. The oil filter was also changed and quite strangely the old one was bone dry. All the engine bits came from Bond Spares as luckily the Regal engine was also used in the first Bond Bugs. From Bond Spares I also got two white plastic plugs that I have bashed into either end of the swinging arm to stop any water entering inside.
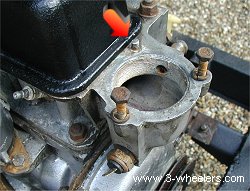
Things were going well until I took of the water outlet branch on top of the engine. The first two bolts came out and then snap the third one broke. My brothers stud extractor could not get in the gap and so I shall have to try with some mole grips. If not it will have to be drilled and helicoiled. The thermostat underneath had more minerals in it than Cheddar Caves, I was amazed at the mineral formations that had built up. Taking the water pump off this seemed OK at first but then we realised it had a bit of play in it and so I shall replace it. My brother has taken the starter motor home to overhaul and the dynamo is being replaced by an alternator. The rocker cover and air filter are fitted just for the photo really and to keep any dirt from getting inside. Neither of them have been bolted down. Under the rocker cover all the tappets and springs seem quite happy so we will leave those and test the engine once everything has been attached to it and prior to fitting the body.
As the evening started to approach we got to that stage where we could not really do much more and so cleaned up. I said to my brother, Surely as we progress with this build then we must get cleaner and cleaner after a days work - as all the bits we use are clean. He said, You would think so but its not always the case I looked at him and apart from the obligatory dirty hands he looked quite clean. My theory seemed therefore to have a sound basis - that was until I actually caught site of myself in the mirror. My face and arms with covered in with dirt ... Im obviously the mucky one!
Elvis Payne
May 2004
Go to Part 6 June
Note:
|