|
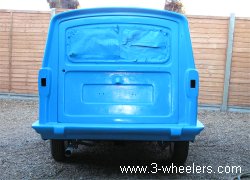
When you think that when I owned a Reliant Robin I painted that with two coats of paint in one afternoon. It was just a case of buy 5 or 6 cans of paint from the local car shop, mask off anything shiny and transparent and then paint the car. Let it dry, unmask said items and job done. Although very crude it actually looked fine for years. So bearing that in mind the fact that I am actually going to wait at least 2 weeks before I flatten off the first layer of the paint ready for the next coat is amazing really. Better still after one week the paint hadnt fallen off, blistered, popped, gone funny or anything. So as the paint on the body was still quite fresh I set about the back door. As Id unwittingly attacked my spare back door with a sander on a drill, my plan was to use the original door. Sadly upon looking at it further showed that it was really badly warped all along the edge by the hinges, and where the hinges once sat it was all crushed. I then looked at the spare door attacked with the sander. This was fine except for a rather large hole at the bottom. It seemed the logical choice and so I patched up the hole, sanded and filled all the sanding marks and then finally painted it.
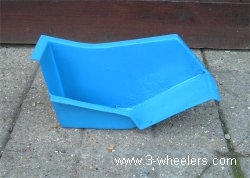
Another part that needed fixing was the fibreglass clutch pedal housing that fits under the body and protects the back of the clutch pedal from dirt. I have not seen many Regals with this fitted so I guess it probably gets damaged and lost easy. The one I had was greasy and full of holes but after a bit it was clean, blue and fully repaired. For some reason I always thought this part was a cover for the brake master cylinder but I was wrong. (again).
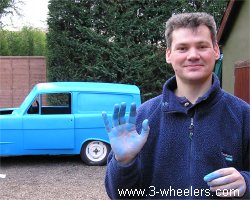
Two weeks finally rolled by and so I took a sheet of 1000 grit wet and dry and spraying a fine mist of water on the body tested a bit to see how it went. It flattened down just fine and so I then did the whole car which as you can imagine took a little while. After that I repeated the whole process again with 1200 grit wet and dry though I did not spend as much time with that one. Once the body dried out it was covered in white dust and so using a tack cloth and airline, I cleaned it all off and it did look a lot smoother. Flattening the car turned my hands bright blue as the paint and water blended into each other. At this point my girlfriend (Sue) sees me and looking at my hands asked, will that come off?. I looked and replied, I certainly hope so. With that Sue says, Your hands are the same colour as a Smurf ... infact your car is a Smurfmobile. I looked and said, Oh dear, I wish you hadnt said that, I can now picture the car covered in blue Smurfs. Not quite the look I was after.
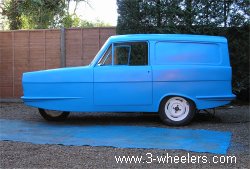
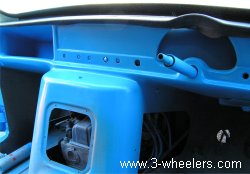
Amazingly for January the sun was shining and so I mixed up more paint (50% cellulose & 50% thinners) and set about another coat. This appeared really smooth so I waited an hour to let it outgas and then applied a third coat. Most things I have read say that three coats of cellulose is OK but at this point I still had just under a litre (or two litres if you count it after being mixed) of cellulose left and so the following day I gave it a fourth coat and the colour looks nice and deep now. In addition to the outside I also sprayed the dashboard blue, the dashboard was coloured on 21E models but mine needed painting so I thought Ill do it blue. Once the wood veneer is added to it and the speedo and switches that should break up the blue quite a bit.
The body looks great but a close scrutiny does reveal a few places where there are 120 grit scratches and when the sun catches it a few blemishes appear that never show when the sun is hiding behind clouds. It amazes me that I have spent so long trying to cure all blemishes and I think I have when suddenly I find another one. I guess the fact you have to look for them though is good and they are not sticking out and whacking you with a wet kipper and shouting look at me as you walk passed. On the whole I am happy with the body, looking at it now there is just no comparison to the damaged carcass it once was. The only thing I am not happy with is the back door as with the bottom section being sunk I can not get in enough to make it all flat. It looks fine until the flash of a camera hits it or lights do and you can see a few dents in it. As my girlfriend said, most of it will be hidden by the number plate but I would just like to get it a little bit better if I could and get to a stage where Im happy with it.
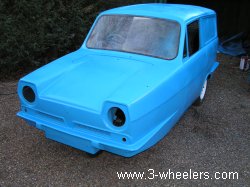
As I have mentioned to a couple of folks via e-mail. The car will never be a concourse car as it was never my aim to build a car for that reason. What with many Reliant Robin & Landrover parts along with my choice of colour the car is far from original. My aim is not to build an as new Supervan but to build a 3-wheelers.com model replica.
I will need to leave the body a few weeks now before I attempt to cut the paint and polish it up. In the mean time though I can rebuild the doors and get the electrics sorted out.
For the end of this update I would like to make a little announcement and let the readers of this monthly update be the first to know that this whole project is to be turned into a book. Contracts with the Publisher have now been signed and the book is underway. Its still a long way off but more news about it will appear on the site nearer its publication date.
Elvis Payne
January 2005
Go to Part 14 February (2005)
|