|
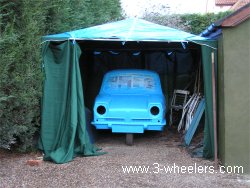
The beginning of January brought with it storms that hit some parts of the country with 120mph winds. I wondered just how long the gazebo was going to last and listened to it as over night winds of up to 90mph bashed it around. In the morning I expected the worst but was stunned to see that it was still standing. The wind had blown everything else around but the gazebo was spared, I guess the fact that it is now supported each side with large wooden post and has a sheet over it pinned to the ground really helped it. In the past you could sneeze and the thing fell over.
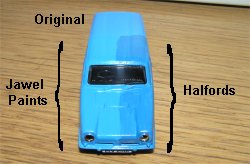
Following the storms the next few days were actually quite warm and we had a few sunny days with temperatures of around 12 degrees Celsius. This I thought is ideal painting weather. I was still baffled as what to do about paint and had visited my local Halfords. They state, With 45,000 colours to choose from, we'll mix the exact colour for any car and motorbike (or anything else for that matter) while you wait. Thats fantastic I thought and so I called in and said, Id like some paint mixing please. They asked what colour and I handed them a 3-wheelers.com model and said, This colour. Apparently they cant do that. Unless you walk in and say something like, I have a 1995 Rover 623SLi in Nightfire Red or, I like paint code blah blah blah they can not help. My girlfriend and I then spent about 40 minutes going through all the paint cans they had and the nearest match seemed to be Ford Wedgewood Blue. But when I painted it on a broken model (wonky wheel) the colour was very different.
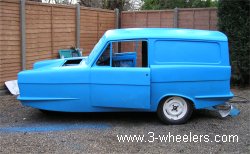
My brother then mentioned Jawel Paints who are a local company. So one night from work I popped in and asked, Can you mix car paint this colour and presented a 3-wheelers.com model. Within 5 seconds the chap pulled out a pack of colour samples and said, ah thats RAL 5012 then went on to ask how much I wanted and asked what was I spraying over etc etc. I was stunned, within 15 minutes the paint was mixed and in a tin in front of me. Back home I painted the other half of my model and as you can see (top photo) when compared to the back of the model the colour is almost identical. What a result, and it worked out cheaper than Halfords to.
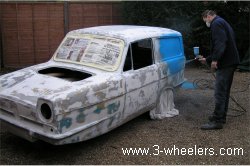
Back at the car I gave it a rub over with a 1000 grit wet and dry, though I have to be honest, my patience for all things to do with sanding was waning fast and so the rub down was not perhaps the meticulous affair it should have been. With the body cleaned with a tack cloth and a bit of thinners, I then set about painting and was overjoyed as I saw the whole thing turn blue. Better still the whole body looks pretty straight though I did notice that the centre of the roof (as expected) and the bonnet lid instantly showed up a few bumps and dips. I decided though there has to come a point where enough is enough and except that the body will never be 100% perfect. (mainly as a result of me sanding away too heavily). If I do another car I will prepare the body in a totally different way but I feel without taking another 3 months of sanding and filling, Ive done the best I can ... or to be brutally honest, the best I want to do. This sadly reflected by the fact that I did not paint it with another coat of primer prior to spraying it. The car has had a million coats of primer already, most of them sanded off, so good or bad and because I had none left, I decided to not apply one.
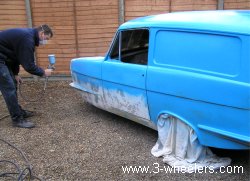
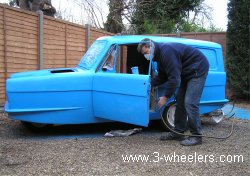
I used anti bloom thinners and mixed it with the cellulose paint 50/50, thanks to my dad I used his new gravity feed paint gun with my brothers oil / water trap at the bottom of it. I started from the back of the car, then painting the roof first, before moving onto the front. Apart from one small drip on the passenger door, the whole lot appeared to go on wonderfully with no blisters, chemical reactions or anything. It even seemed to cover well to as I know cellulose is not the thickest of paints. I shall now leave it two weeks, then flatten it down ready for the second coat.
Go to page 2
|