|
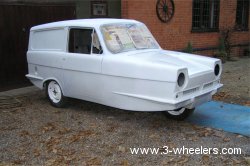
Well Ladies and Gentlemen, the car was blue in September, grey in October, yellow in November and in December ... well its white now. All we need is some festive snow and it will blend in nicely. Anyway the temperature in December was no kinder and with an average temperature around 5 degrees Celsius my brother dug out his large calor gas heater. I bought a new bottle of gas and we stuck it in the garage. A couple of hours later it was lovely and warm in there.
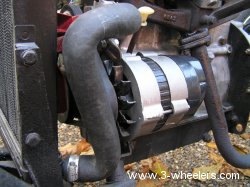
As the garage heated up we set about doing things that cold didnt really disturb. Since my last instalment I discovered that the fan we had on the alternator was actually correct. The fan does not push air into the alternator, as I assumed, but sucks it out. Thanks to all those who sent me photos of alternators on later Reliants, all of them were fitted this way. So that was great, with the body off once more the alternator was fixed into place and the fan belt tightened. One thing we did discover was that at first we had placed a diesel fan belt pulley on the alternator. This resulted in the fan belt being loose. When we realised the fan belt pulley was changed for a larger petrol one and with a standard 700 fan belt the tension was spot on.
With alternator fixed on this meant that the running gear and chassis truly was finished and so the body was mounted back on to it. With a large box of shiny new Zinc plated bolts & washers, the body was bolted down. This is the last time we will see the chassis bare during this restoration. I recall that when the body was originally removed in March 2004, there was a number of large washers along the chassis. It seems that these were for padding as in some places there is quite a gap between the body and the chassis that needs filling.
Body firmly on the steering box and assembly we all fixed into place to, though for the time being I am still using an old Regal steering wheel until we need the repainted one I have. It is very strange working under the car and seeing everything so clean. The metal work shines and there isnt a spot of rust or dirt in sight. Not the sort of thing Im used to whilst scrambling underneath a car. The doors were the next job; some folks may argue that its better to paint them off the car but we decided that wed get the side doors fixed on. The first thing that we noticed is that if you just bolt them on they dont work, which is a shame as whilst Geoff was sat inside the car with the socket set, I was couched up like Houdini in a tiny space, bending my fingers left right and centre, trying to put the nuts and washers on the back of the bolts. Fixing the door straight on means that it just does not sit right, as a result small packing plates are needed behind the hinges, and not just two here and two there. It was a case of two there, three there and two over here. So after much door opening and closing and bolt action the doors finally swung neatly closed with a satisfying yet rather feeble click. We did the passenger door side and must have become expert with the drivers door as that just took us about 10 minutes to get right. Whilst under the body I had a look at the alternator, despite being about an inch wider than the original dynamo, it still has plenty of clearance from the body. I was a bit concerned incase it was too close but I neednt have woried.
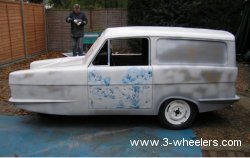
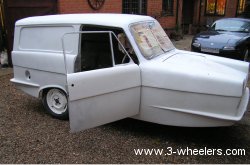
By now the garage was fairly warm despite a rather evil draft coming from under the door across my legs. Two lumps of foam soon sorted that out. The gas fire was extinguished and we mixed up a pot of REFACE that is a polyester resin type spray. It certainly is thick to. Initially we sprayed all the low areas twice to help build them up and then sprayed the high areas with a thin coat so that it was all one colour. The spray gun we had seemed to be a bit slow and at times like a snow machine and so knowing there was a much large nozzle and the Tetra Shultz gun used that. That was superb and the REFACE goo came out leaving a wonderful coat, all be it a little thick, but I figured that doesnt matter as when its sanded back there is more chance of getting a flat side. After the drivers side was done it looked pretty good and so then we did the roof and front of the car. Getting round to the passenger side we did the same thing - apart from we had not thought about the passenger door being painted. Despite a light sanding and cleaning with thinners the REFACE product didnt like the door one iota and started to head downwards with an effect that looked like that chap in the Incredible Melting Man. As far as art goes it was quite cool with overtones of a Pollock masterpiece. Perhaps I should have framed it and called it Bluebell Mist .. sadly as far as painting a door on a car goes it is a disaster ... maybe I should hang it on the wall in the National Gallery or something?
Despite being somewhat despondent at seeing the door I decided to leave it and see what happens. When it sets I shall just sand it all back and this time make sure the paint is removed before hand. Luckily the REFACE has coated the whole car fine and I am quite confident that it will sand down to give me nice smooth sides ... so its just my passenger door that looks like a Halloween mask.
Go to page 2
|